Initial Debian Setup
In the previous post, we went through an example of installing Debian GNU/Linux. Once the installation is complete, it is a good idea to adjust the system for comfortable everyday use and customize it to your needs. In this article, I will share the basic steps I usually perform myself. This approach applies to most Debian-based distributions.
System Update#
The first mandatory step is updating installed packages. See a detailed breakdown of the procedure here.
Installing Additional Software#
# obtain superuser privileges
sudo -s
# install required packages
apt install vim
Quick Vim Cheat Sheet#
Editor modes: Normal mode and Insert mode.
Esc: return to Normal mode
i: enter Insert mode before the cursor
a: enter Insert mode after the cursor
o: enter Insert mode on a new line below

Navigation:
h, j, k, l: move left, down, up, right (arrow keys also work, but not always predictably)

Saving and exiting (Normal mode):
:w  - save
:q  - quit
:wq - save and quit
:q! - quit without saving changes
Network Configuration#
During installation, DHCP was active, so the IP address was assigned automatically. Let’s set up a static IP address.
Changing to Static IP Address#
Since the system was installed without a GUI (headless/server installation), Debian uses ifupdown by default to manage network interfaces.
For Debian systems with a desktop environment (and by default in the RedHat family),
NetworkManageris typically used. Its configuration is outside the scope of this article.
Open network interface settings in a text editor:
sudo -s
vim /etc/network/interfaces
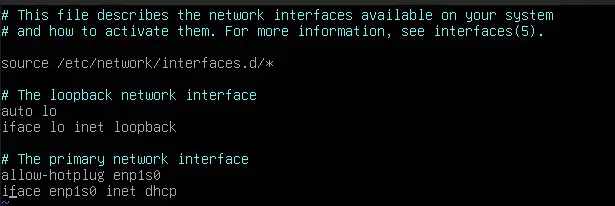
Change the configuration mode for the required interface (in our example, enp1s0) from dhcp to static, then specify address and gateway. Save changes and close the file.
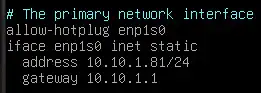
Since we disabled DHCP, we need to specify DNS servers manually:
vim /etc/resolv.conf

...
nameserver 10.10.1.1
Restart the networking service. Be careful if you are connected to the server via an SSH session rather than a physical or virtual console.
systemctl restart network
Adding a Static DNS Record on MikroTik (Example)#
/ip/dns/static/add address=10.10.1.81 comment=deb-lab1 name=deb-lab1.lan type=A
Completely Disabling IPv6 (If Not Used)#
Edit the /etc/default/grub configuration file:
# Add ipv6.disable=1 parameter
GRUB_CMDLINE_LINUX_DEFAULT="quiet ipv6.disable=1"
Update the bootloader configuration and reboot the system:
update-grub
shutdown -r now
Changing Default System Editor to Vim#
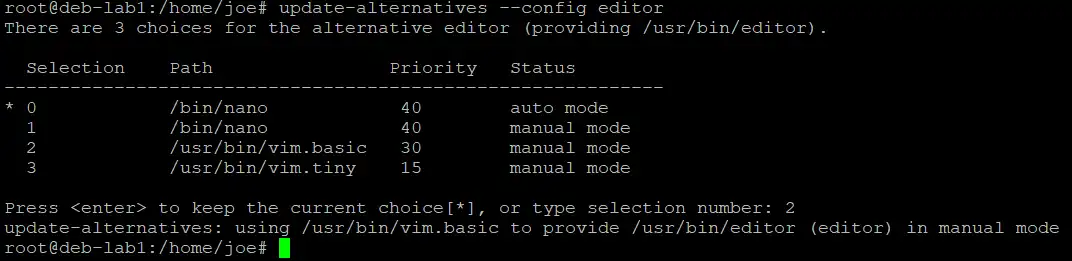
To set the default editor, use the update-alternatives utility:
update-alternatives --config editor
Configuring Vim for Better Usability#
Create or edit the .vimrc file in your user home directory:
vim ~/.vimrc
Add the following base parameters:
" color scheme
colorscheme desert
" tab width set to 2 spaces
set tabstop=2
" replace tabs with spaces
set expandtab
" number of spaces used for autoindentation
set shiftwidth=2
" copy indent from current line when starting a new line
set autoindent
" smart indentation for C-like languages
set smartindent
" enable syntax highlighting
syntax on
Setting Up Shell Aliases#
Edit the .bashrc file in your home directory. If these lines are already present and commented out, simply uncomment them:
alias grep='grep --color=auto'
alias ll='ls -l'
Disabling sudo Password Prompt (Optional) and Preserving HOME Variable#
If needed, you can disable password prompts for sudo commands. Modifying sudo configuration must be done using the visudo tool.
Run the command under the root user:
visudo
Change the line:
%sudo ALL=(ALL:ALL) ALL
to:
%sudo ALL=(ALL:ALL) NOPASSWD: ALL
Also add environment variable retention for HOME. This keeps user custom alias and vim settings intact when running commands via sudo:
Defaults env_keep += "HOME"
Example configuration:

SSH Public Key Authentication#
If your workstation still lacks an SSH key pair for secure authentication, it is time to generate one. Client configuration, key generation, and importing the public key to the server were covered in detail in our previous post.